
ClickAdilla launches Rules, enabling advertisers to automatically blacklist traffic sources. Optimize your budget and boost conversion rates by focusing on high-quality traffic with customizable metrics. Explore how this tool can enhance your campaigns!
We’re excited to introduce a powerful new tool to your ClickAdilla account: Rules! This feature takes campaign optimization to the next level by automatically blacklisting traffic sources, saving you time and improving results.
What is this new Feature?
The Rules function lets advertisers automatically exclude sites and ad spots based on customizable conditions. You set the metrics — like cost, clicks, or conversions — and the system monitors performance in real-time, if a traffic source doesn’t meet your defined condition, it’s automatically blacklisted, helping you focus only on what works. By focusing on high-quality traffic, you can enhance your conversion rates and make better use of your ad budget. With this new feature, you can filter out these sites based on your set condition.
When creating conditions, you'll need to:
- Define the condition that triggers the rule. For instance, if a site generates 10,000 clicks in just 7 days but only leads to 100 conversions, it could trigger the rule.
- Specify the action that the rule will take, which could apply to the current campaign or active ads.
Note: Rules perform one main action: blacklisting sites or spots.
Key Benefits for Advertisers
Using well-defined rules for your campaign traffic not only helps improve targeting but also maximizes your advertising budget and saves you time. With this new feature, you can:
Efficiently Manage Your Budget
Traffic from certain websites may not deliver the conversions you expect, potentially impacting your budget without yielding results. This new rule feature helps you make the most of your ad budget by automatically filtering out traffic sources. With rules in place, these sites are automatically blacklisted, ensuring your ad spend is directed toward traffic sources that show real potential to convert.
Save Time with Automation
Managing campaigns manually can be time-consuming, especially when it comes to monitoring traffic quality. The rule feature automates this process, constantly checking your campaign's performance and adjusting the traffic sources according to the rules you’ve set, therefore, instead of manually evaluating each site, the system automatically filters out sources that do not align with your goals, allowing you to focus on strategy and creative work.
Improved Your Ad Performance
By ensuring that your ads are only shown on websites that meet your performance criteria, the rule feature optimizes your campaign for better results. Sites that don’t fit with your objectives are automatically removed, while ads continue to appear on high-quality, high-converting sites. This continuous optimization helps to increase your conversion rate, improve your return on ad spend (ROAS), and boost the overall effectiveness of your campaigns.
How to Set Rules
Note: Whitelists take priority. If a campaign is on the Whitelist, you can’t apply Rules.
- Go to the Rules section
Go to the Campaigns tab on the left menu > Select the campaign you want to optimize > Configure the Rule section to fit your needs
2. Get ready to configure a Rule
Note:
- Rules should automate actions based on clear objectives, like improving campaign efficiency or reducing ad spend. Define what outcomes you want to achieve with each rule.
- In your campaign settings, you have the option to use both Blacklist and Whitelist features. You can add targets to these lists either during the campaign setup or at any point after the campaign has launched.
- Please be aware that the Rules function automatically manages the Blacklist, but the Whitelist also affects how they work.
- When creating a campaign, if you select the Whitelist option, you won't be able to create rules for that specific campaign. Additionally, if a target is added to the Whitelist after the campaign is already running, any rules associated with that target will become inactive.
- In summary, Whitelists take precedence over Rules. If a campaign is included in the Whitelist, you won't be able to establish new Rules for it, and any existing Rules will no longer apply.
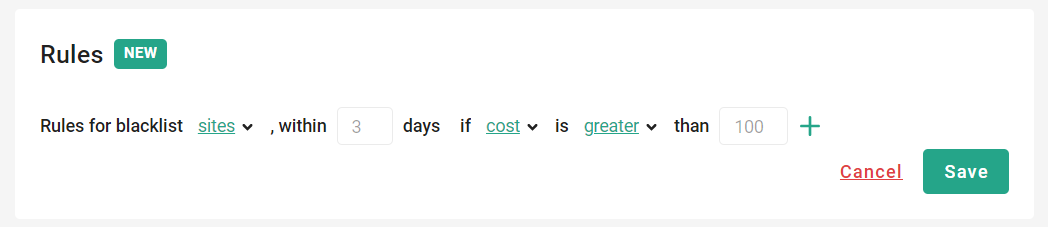
3. Choose between sites and spots
- Sites are entire websites where ads appear.
- Spots are specific locations or placements within those sites where ads are shown.
4. Enter the number of days
This defines the period for which statistics will be considered.
Example: Suppose you launched a campaign 4 days ago and now want to create a Rule. Next, you set a 3-day period for the Rule.
Note: The Rule will then use statistics from the previous 3 days.
5. Select the metrics
Cost, impressions, clicks, or conversions are the statistics the Rule will take into account during the period you’ve previously set.
6. Choose how to compare
Decide if the metric should be greater or less than the value you expect for sites/spots, and then enter that value.
Please note: If you decide to archive a campaign, the Rules will be deleted.
How Rules Work
Let’s dissect how rules work with the scenario below:
Scenario:
A campaign started 4 days ago, however, you set a rule that “Blacklist sites if the cost over the last 5 days exceeds $100.”
What Happens:
The rule is meant to evaluate the cost of traffic over the past 5 days and blacklist sites if they exceed the $100 threshold. However, since the campaign has only been running for 4 days, the system can only look at the data from those 4 days. As a result, any site that has spent more than $100 in the last 4 days will be blacklisted.
Why:
Because the campaign has not been active for a full 5 days, the system will use the data that is available from the time the campaign has been running. It cannot look at data that does not exist yet. Therefore, sites that exceed the $100 threshold in the available 4-day window are blacklisted.
Insight: if the period specified in the rule is longer than the campaign's current duration, the system will automatically adjust and use the data from the available period. This means that even though the rule mentions 5 days, it will still work effectively by using the 4-day data. Keep in mind that rules only become active after a campaign has been running for at least 24 hours.
In shorter understanding:
- Define the Rule: Choose metrics to track (cost, clicks, impressions) and the time period (e.g., the last X days).
- Statistics Analysis: Rules are applied after your campaign has been live for at least 24 hours, allowing time to gather enough data.
- Applying the Rule: The system will automatically add sources to the blacklist if they meet your defined conditions.
Conclusion
In conclusion, the introduction of the Rules feature in ClickAdilla marks a transformative step forward in optimizing advertising campaigns. By automating the process of blacklisting traffic sources based on customizable performance metrics, advertisers can efficiently allocate their budgets and focus on high-quality traffic that drives conversions. This functionality not only streamlines campaign management but also enhances overall ad performance, leading to improved return on ad spend and more effective use of resources.
Ready to experience the benefits of the new Rules feature? We encourage you to test this powerful tool in your ClickAdilla account today! Don’t miss out on the opportunity to streamline your campaign management and maximize your results—log in to your account now and start testing the Rules feature! Your path to more efficient advertising begins here!
![[Case Study: +39% ROI] How I ran $200 on Japan Dating In-Page from scratch and with zero KYC. Inside settings from Clickadilla's Head of Accounts.](/_ipx/f_avif&s_280x160/storage/blog_twitter_linkedin_15f9453250/blog_twitter_linkedin_15f9453250.png)


